Hello there!
This is the second article in the Android App Development For Beginner series. If you have followed along with the previous article, then you will have Android Studio set up.
I will continue this article from where the previous article ended, and by the end, we will be having a Hello World Android App ready!
Let’s dig into it now!
Create a new project
We are now going to create the project, first open Android Studio and you will be presented with this screen.
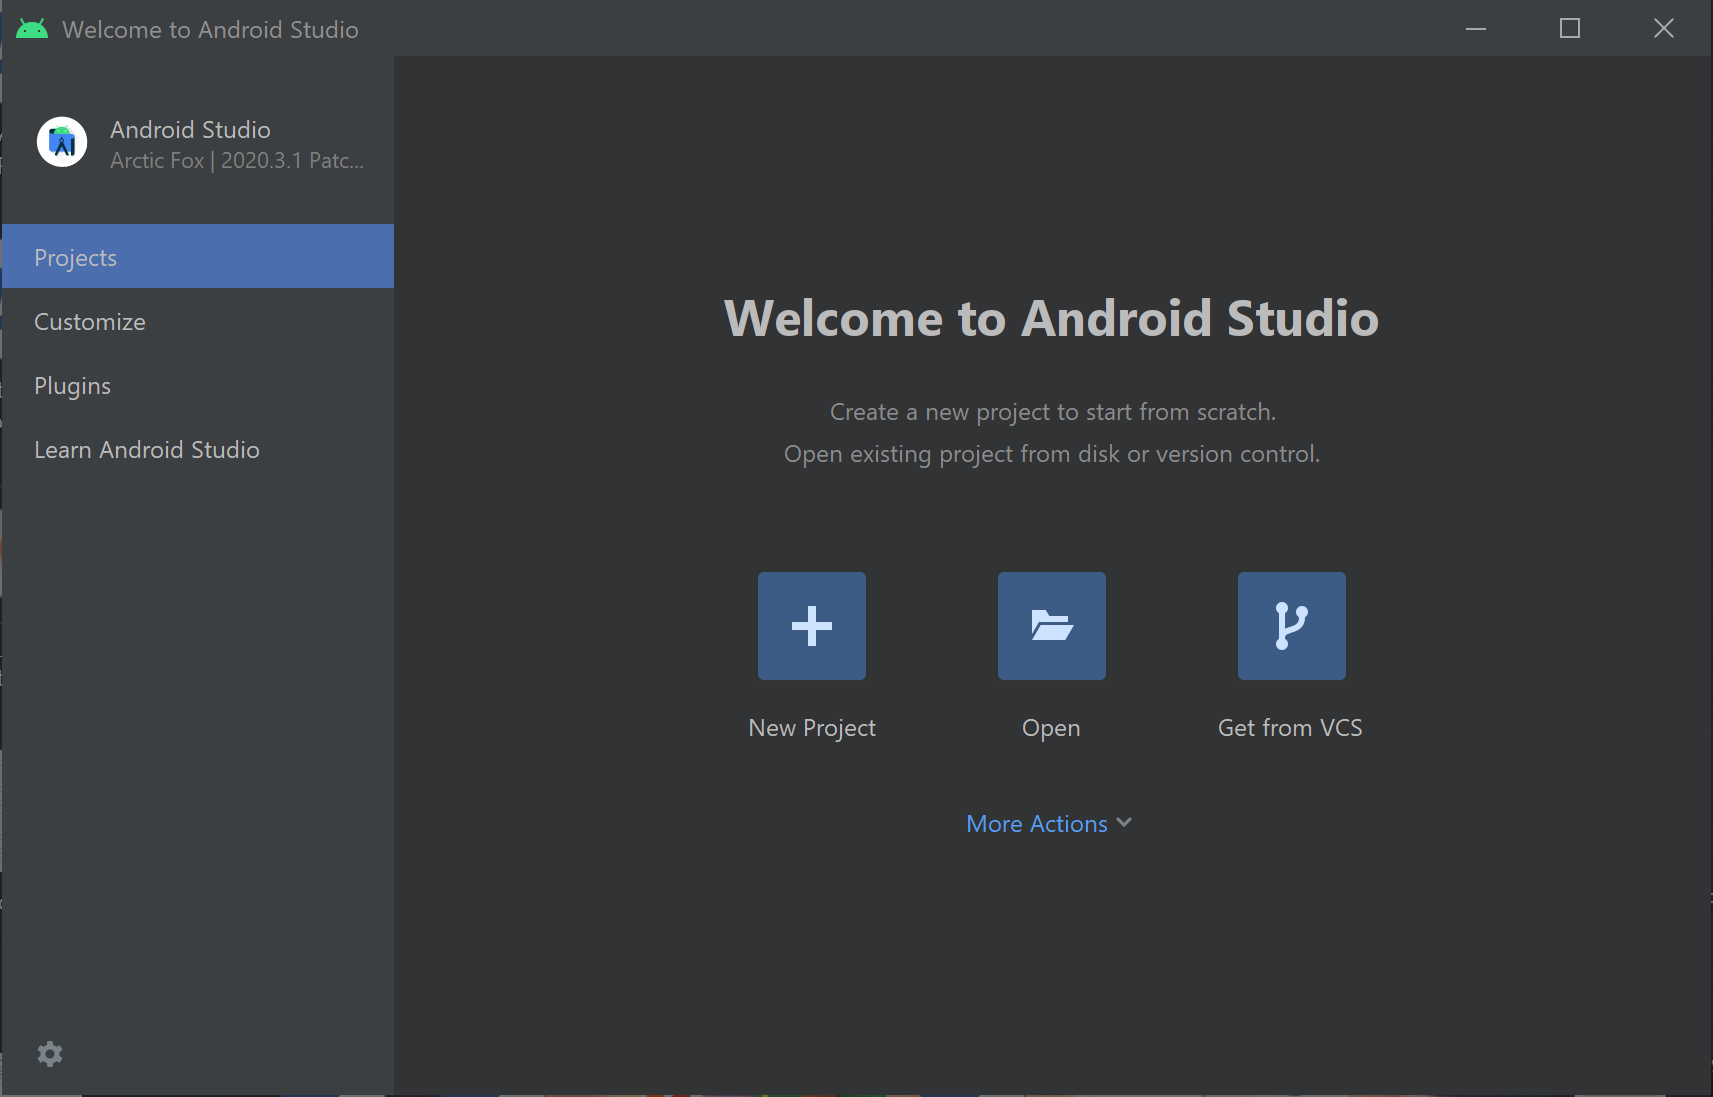
This is the latest Android Studio Arctic Fox 2020.3.1. This might be different from the older post but yeah, the installation process remains the same.
Once Android Studio is open, press the New Project button.
Pressing it will take you to the New Project window.
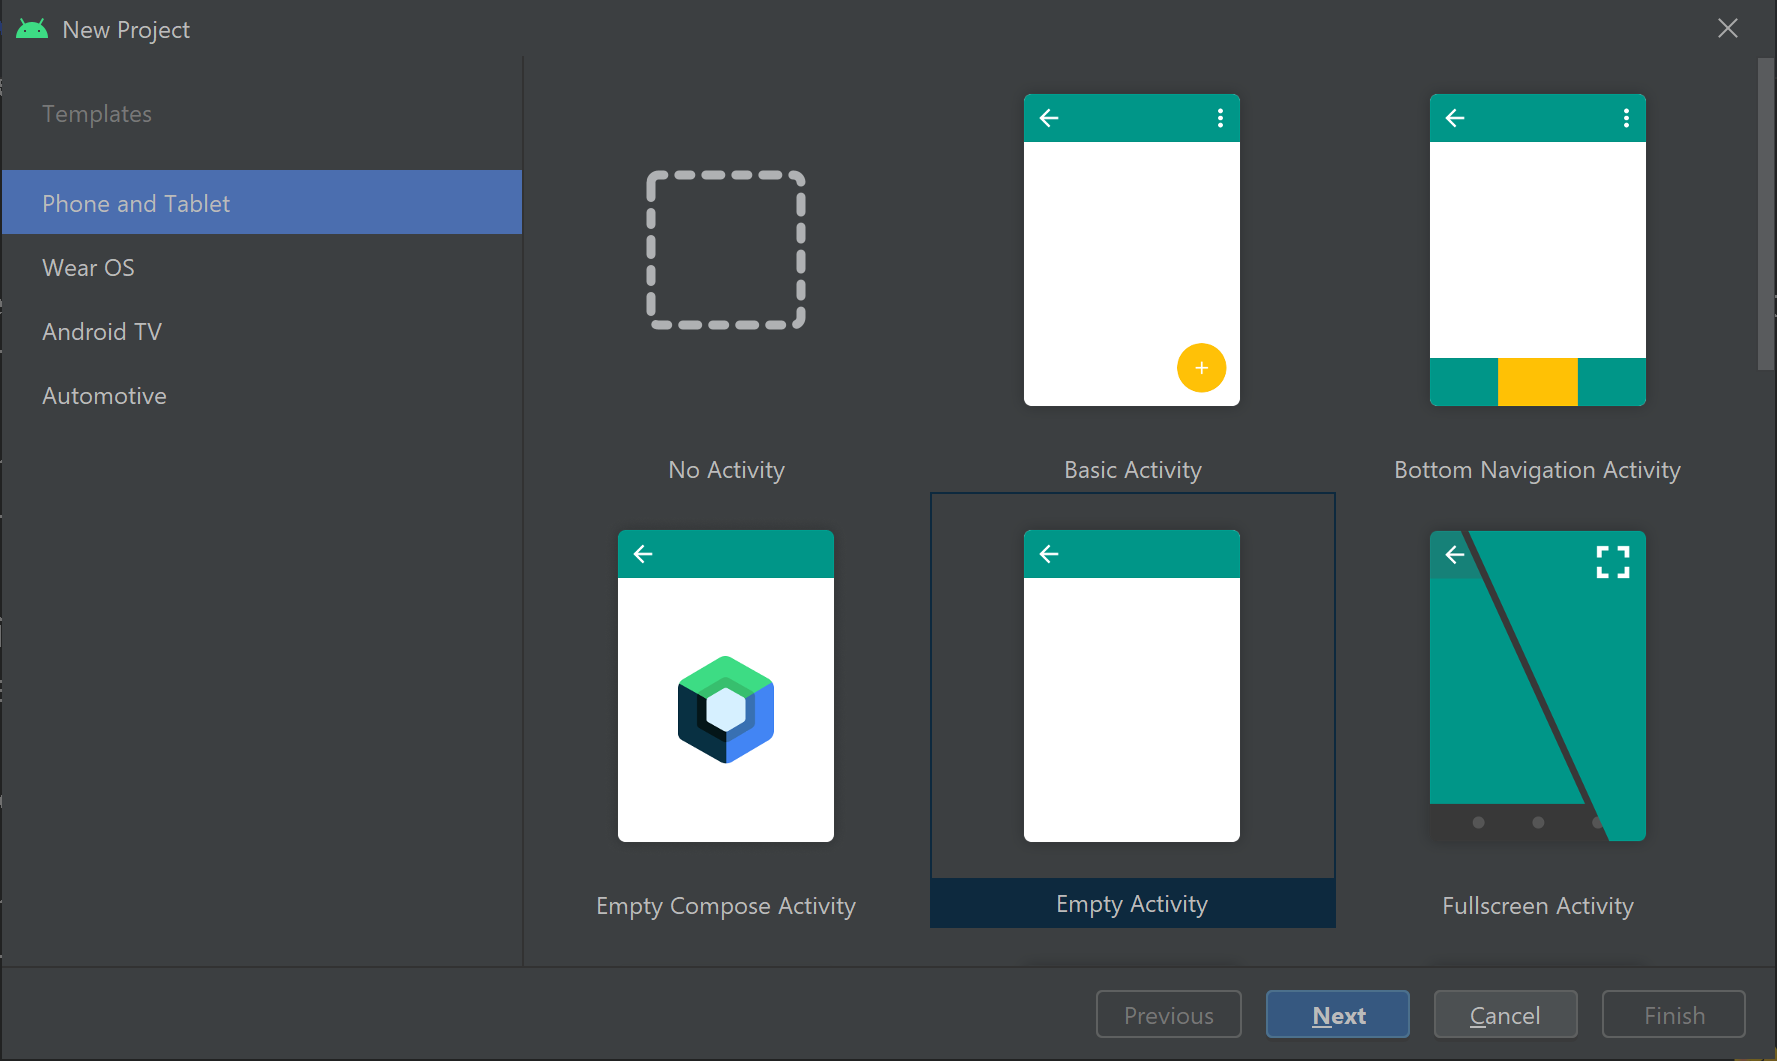
There, you will see a bunch of starter templates for Android Projects, like Basic Activity, Bottom Navigation, Tabbed Activity, etc.
If the word Activity is strange to you, don’t be afraid. I will explain the concepts in the later articles, but for now, you can understand that an Activity is like a page in the app. Anything that you see in an app, that is, the page, is called an Activity.
An app can have multiple activities with multiple widgets in them(called Views) that make the app functional. We will dig into the fundamentals of Android and practice them later, for now, you can go with the Empty Activity.
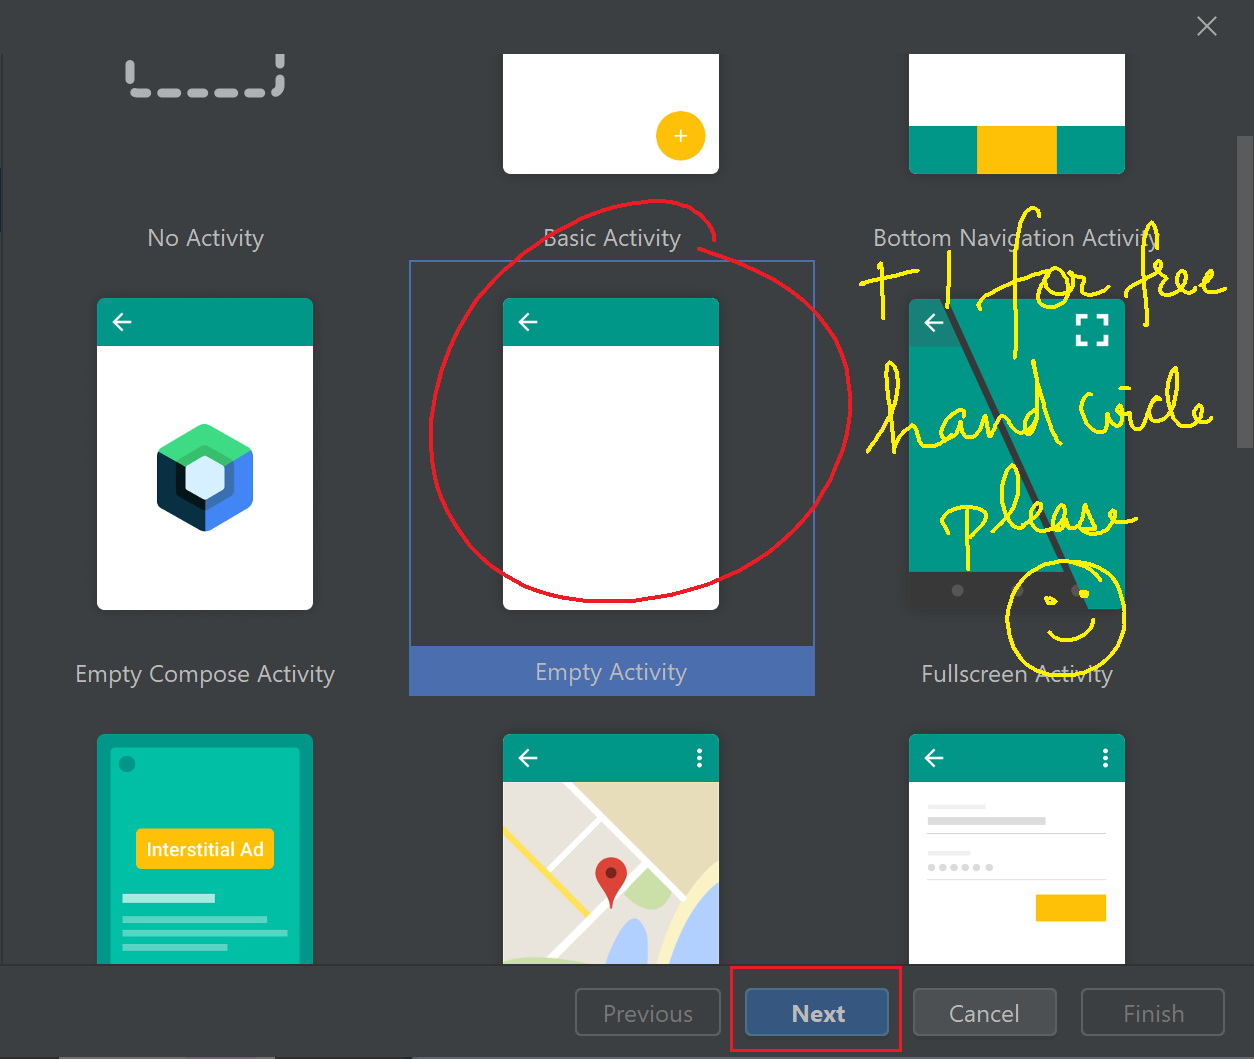
Press the next button. Now you will be asked to give some information about the android app.
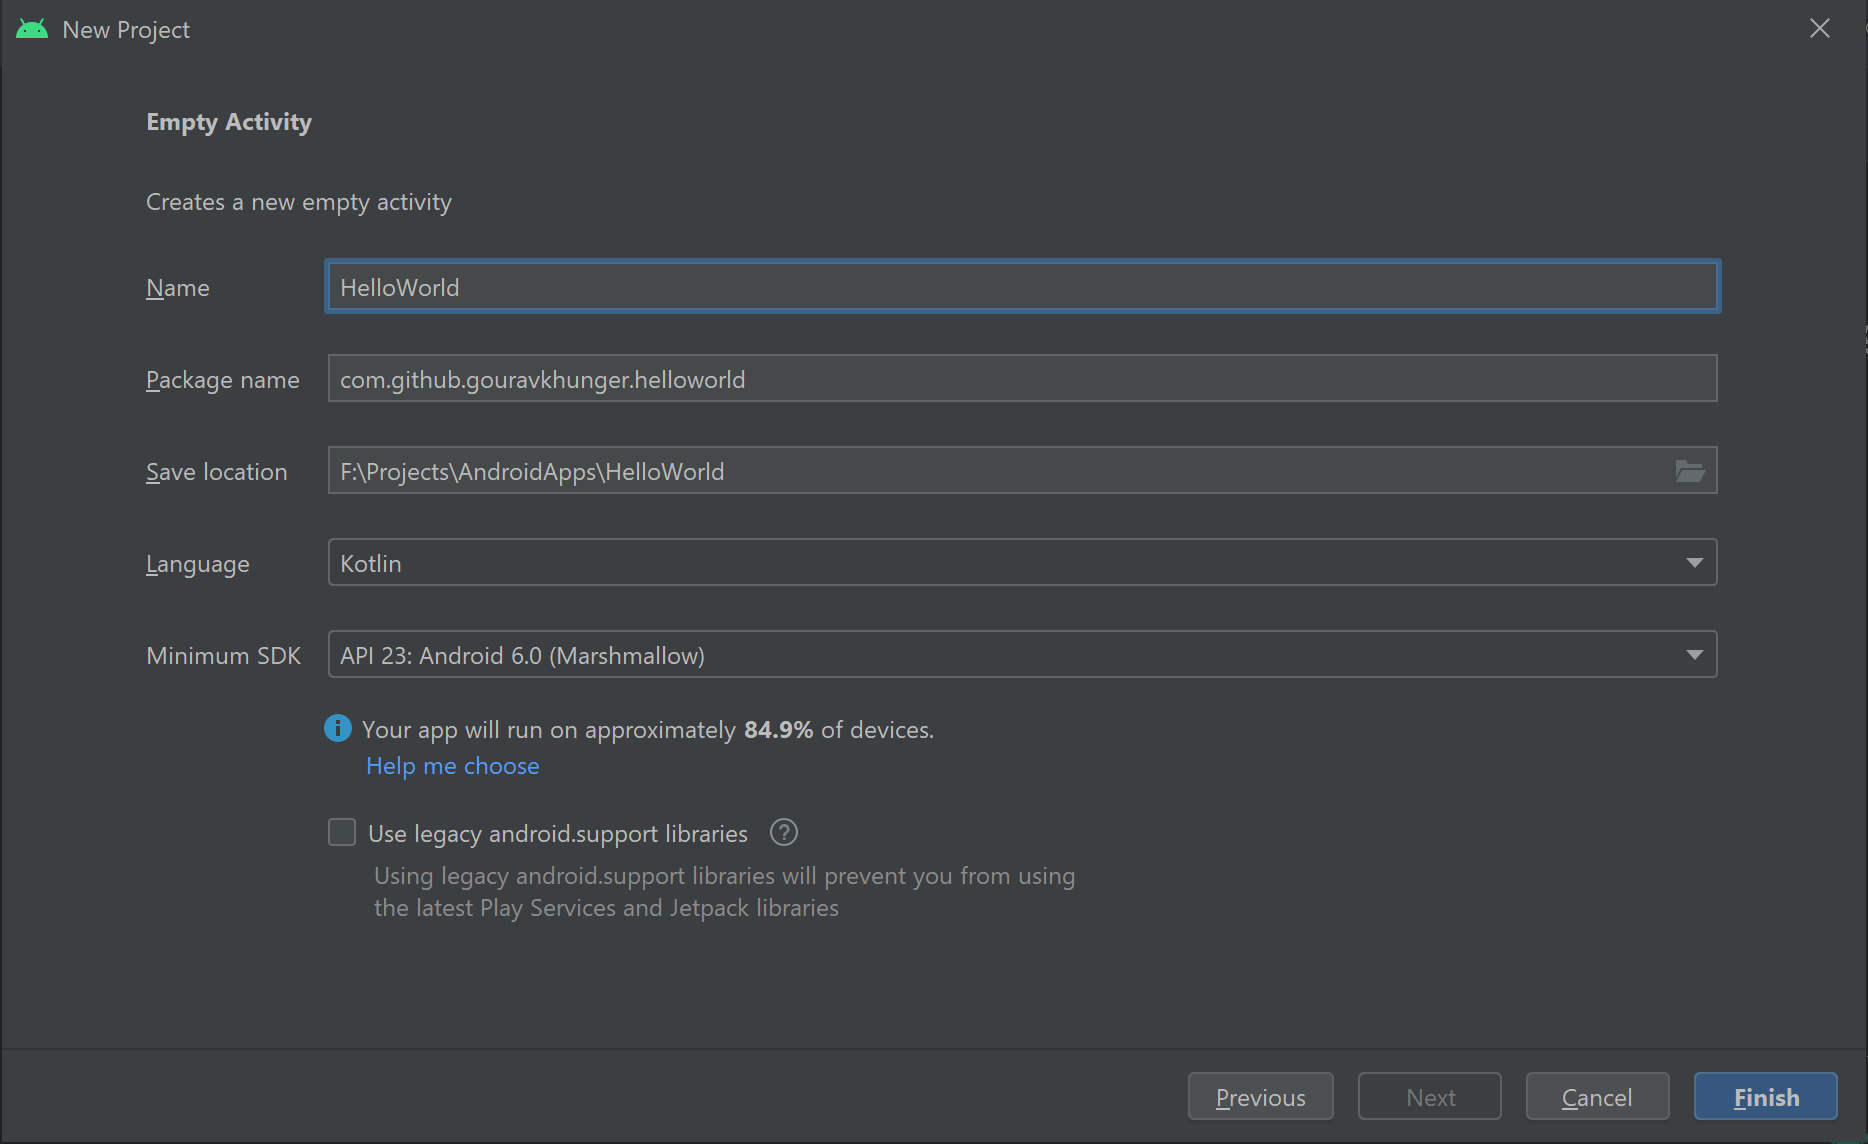
The information required is:
App Name
Give your app a suitable name. If you don’t wish to give it a name yet, don’t worry you can edit this later too.
Package Name
This is a unique identifier of your app. The package name is used by the android operating system to distinguish your app from other apps, and also by the google play store to identify different apps on their platform, no two different apps on the store or on an android device can have the same package name.
Usually, companies give set the package name of their app by reversing their domain. Like:
- Google uses
com.google.android.<identifier-of-app>for their apps. - Whatsapp uses
com.whatsappas their Android app’s package name - Discord uses
com.discordas their app’s package name.
In the same way, if you do have a domain name registered under your name, you can proceed to create a package name as explained above.
Otherwise, you can use the same structure as I am using. Even though I own genicsblog.com and gouravkhunger.xyz, I prefer to use my GitHub URL as the package. Since we are making a hello world app here, I have kept the package name as com.github.gouravkhunger.helloworld.
This identifier is more unique to you because your GitHub account will be used to host your personal projects so I prefer using it that way.
Quick Clarification: You don’t actually need to own the domain you put into the package name, and there will be no verification if you put another domain. But if you publish the project and later someone claims the domain, there can be conflicts so it’s better to use your own, or the way I used my GitHub username.
Save location
Android studio will store the project at this location - feel free to store it anywhere you like. The folder must not exist before as Android Studio will create it for you.
Language
I would prefer to use kotlin because it is the official language to create android apps. I expect you to know a bit of Java or any other object-oriented programming language like C++ because that would help you to adopt kotlin very easily.
Minimum SDK
This is the minimum Android version the app needs to run. It is required to specify it because there are certain things that don’t work in older versions of Android. So to ensure backward compatibility, you need to specify the minimum SDK so that all features work seamlessly on the devices.
You can always change this field later, so you can choose API 23, which is Android 6.0 (Marshmellow), for now. From my past experience, this API level works with most of the libraries (pre-written code for android apps that makes development easier) and works on ~85% of the devices in the market.
Now, you can hit the Finish button and Android Studio will set things up for you! Please wait for 2-3 minutes to let it build the project (depending on your hardware specifications it can take longer/shorter time).

Run the Hello World project
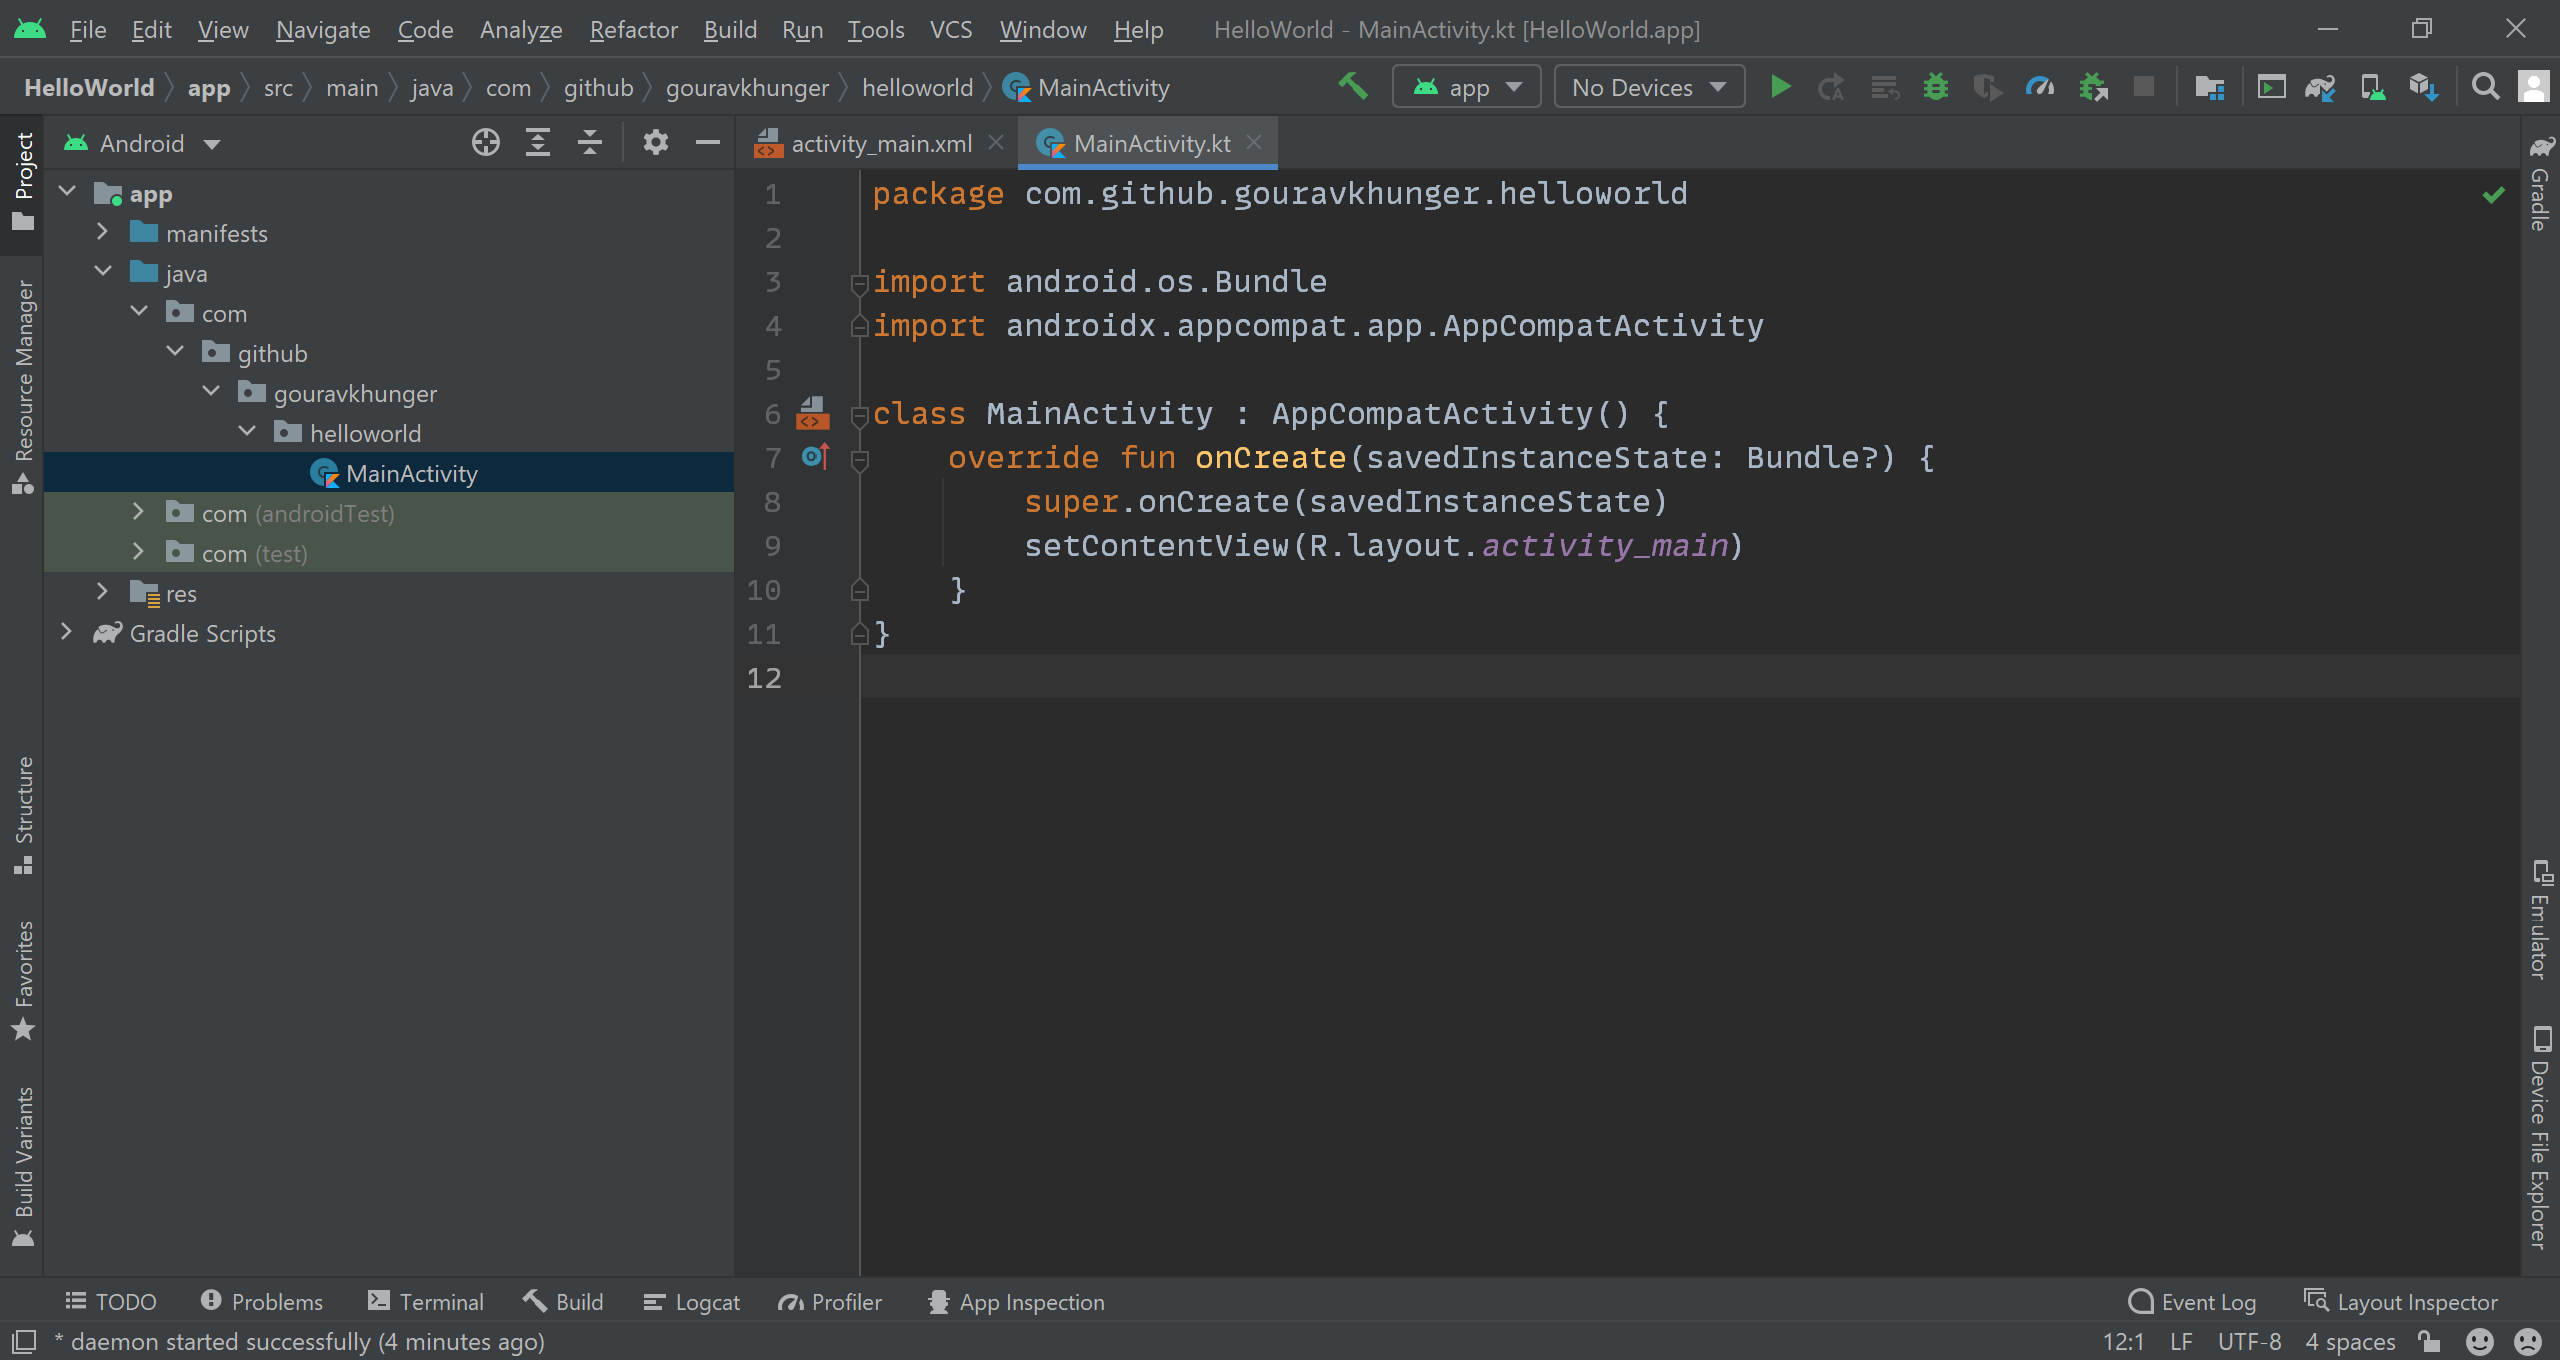
Once the project is built, you will see the IDE window with two files open: MainActivity.kt and acitvity_main.xml. Actually, Android Studio puts in a simple hello world app when we select an Empty Activity, we will go into more details when subsequent articles get released in this series.
In the last article, I explained whether or not you should use emulators or not. In this article, I will run the app on my device but you can also use
Now, you can enable USB debugging on your Android Device through developer options (I will write an article on it and link it here). Then connect your android device to your machine, and you will see that Android Studio shows the device name on the toolbar.

Press the green button beside the name of the device and Android Studio will build an APK and install it on your device. You might need to allow the installation from a pop-up dialog on your device if it is your first time while installing from android studio.
Watch the below gif for the above steps in action.
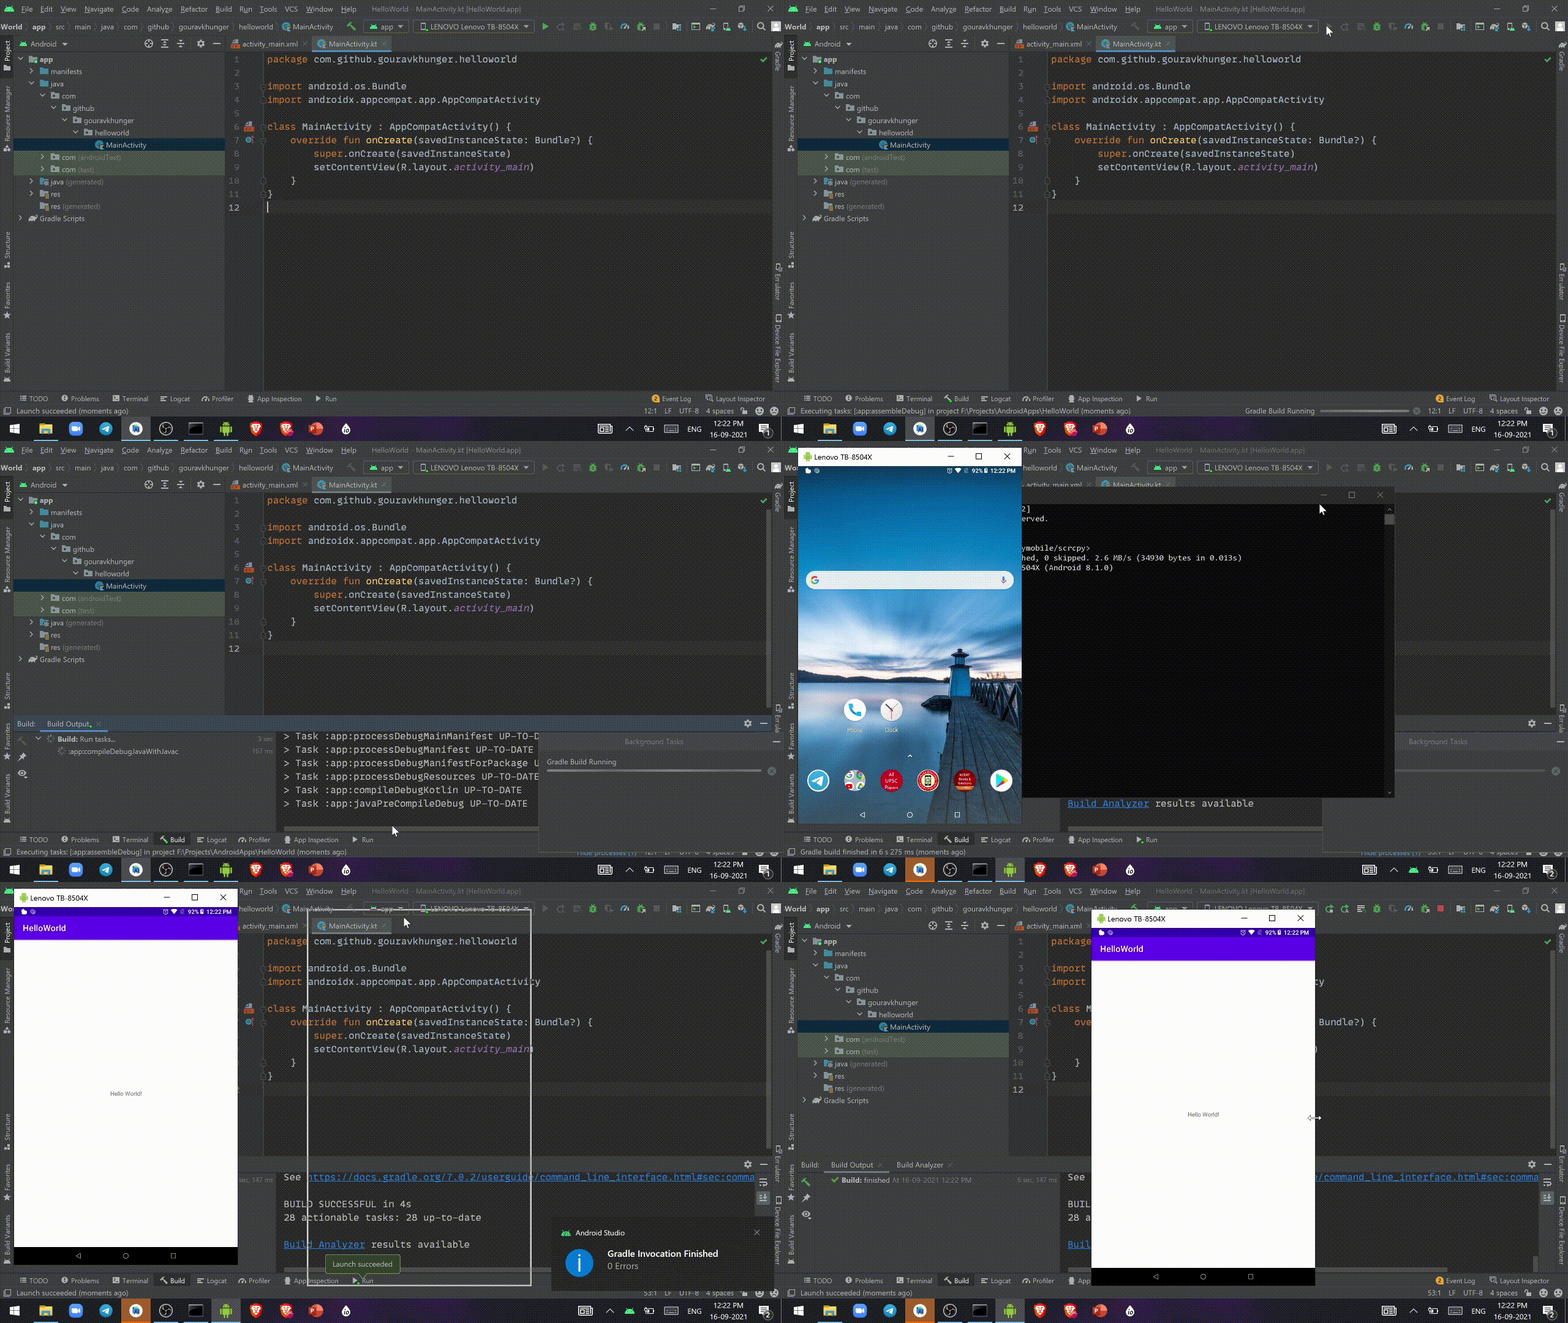
If you are wondering- I didn’t use any android emulators, as my laptop won’t be able to handle screen recording with Android Studio as well as an android emulator open. I have used a tool called scrcpy to simulate my real android device’s screen to the laptop, any changes that occur on the device are reflected on the screen.
It’s instant, so you can opt in to choose that way too if you wish to feel an emulator without really having an emulator.
CONGRATULATIONS!
You have successfully built your first Hello World project and installed it on your device 😀.
I hope you learned something new today! Make sure to subscribe to my newsletter (email field at the starting of this article) to never miss any article I post. New articles coming soon to this series.
I would really appreciate it to know your views on this article. All kinds of feedback are welcome.
Happy coding!
