You would hardly see any Android app that allows its users to be able to choose from a set of fonts to be used for the whole app, based on the user’s preference. The major reason being it is hard to implement!
Why should you bother?
Accessibility is a major aspect that every app developer should focus on. Imagine an app with an amazing utility but one that is barely usable. You don’t want to loose your user base!
I used to neglect this, but here’s why I am writing this post.
If you follow me on any social media, or here on my blog, you know that I built JekyllEx to be able to manage Jekyll blogs from my Android device.
Recently, I a person reached out to discuss about their chronic headaches that are triggered by font and colours that don’t go well on their eyes and it would be great if I allowed some settings to be able to customise it based on user preferences.
I quickly went to have a look at what the Android accessibility guidelines had to say.
But to my surprise- I DIDN’T FIND ANYTHING. If you take a look at those guidelines, you’ll find Google actually emphasizes developers a lot to take measures and make their app accessible for all kind of users. But such a common problem hasn’t been addressed. Believe me, there are many a people with varied levels of such reading problems.
And I usually don’t enable such settings in apps, but I thought it would be a great challenge to overcome, because mostly, all the solutions that already exist are inefficient: most stack overflow answers ask to traverse the ViewGroup’s children and apply custom typeface as they find Text.
I had some other thoughts and it was obvious I would be making an Android library that somehow resolves this issue.
The Challenge
In broad aspects, an Android app is just a set of View(s), held together by ViewGroup(s), that perform certain actions when loaded, clicked, etc. All that together makes the functional app.
But here’s the catch- each view has its own Context, that gives access to the current state of the view, and that makes it harder to think about how to implement the multiple-font feature, as each view needs separate handling to update its font.
Here is a typical example of how to update the font of a single TextView:
val typeface = ResourcesCompat.getFont(this@MainActivity, R.font.source_code_pro) // get font from res/font/ directory
binding.helloWorld.typeface = typeface // apply the font to the text view

Imagine you have 20+ text views, or rather a RecyclerView(as in JekyllEx), in which each of the items has a significantly large number of TextView(s).

Here, each RecyclerView item actually has 8 TextViews! Imagine updating the font manually for each view, one-by-one. It would be really inconvenient!
I had a look to some stack overflow questions and as told earlier, most of them were old and in-efficient.
The Solution
From the very beginning I knew I would store the default font in a SharedPreference. For those who don’t know about it, it is Android’s way to allow apps to store simple key-value paired data that the app can use without write access to the disk. For most of the cases, it suffices to use SharedPreference instead of writing to disk and it was super handy in this case.
I would store the resource id, an integer identifier that is given to all types of resources in any app, in SharedPreference, and retrieve that value to apply the font when the view is inflated (rendered on screen).
This was the most efficient way I could come up with, because SharedPreference is really optimised. The values are cached and retrieving multiple values within a short time doesn’t affect performance much.
There exists another way, by changing the themes.xml values at runtime and applying font directly from the styles itself, but it requires minimum API level 23 (Android 6.0). So it wouldn’t be backward compatible and make the app crash on lower Android versions. I didn’t want to do so.
The Result
As a result, I built the android library Fontize
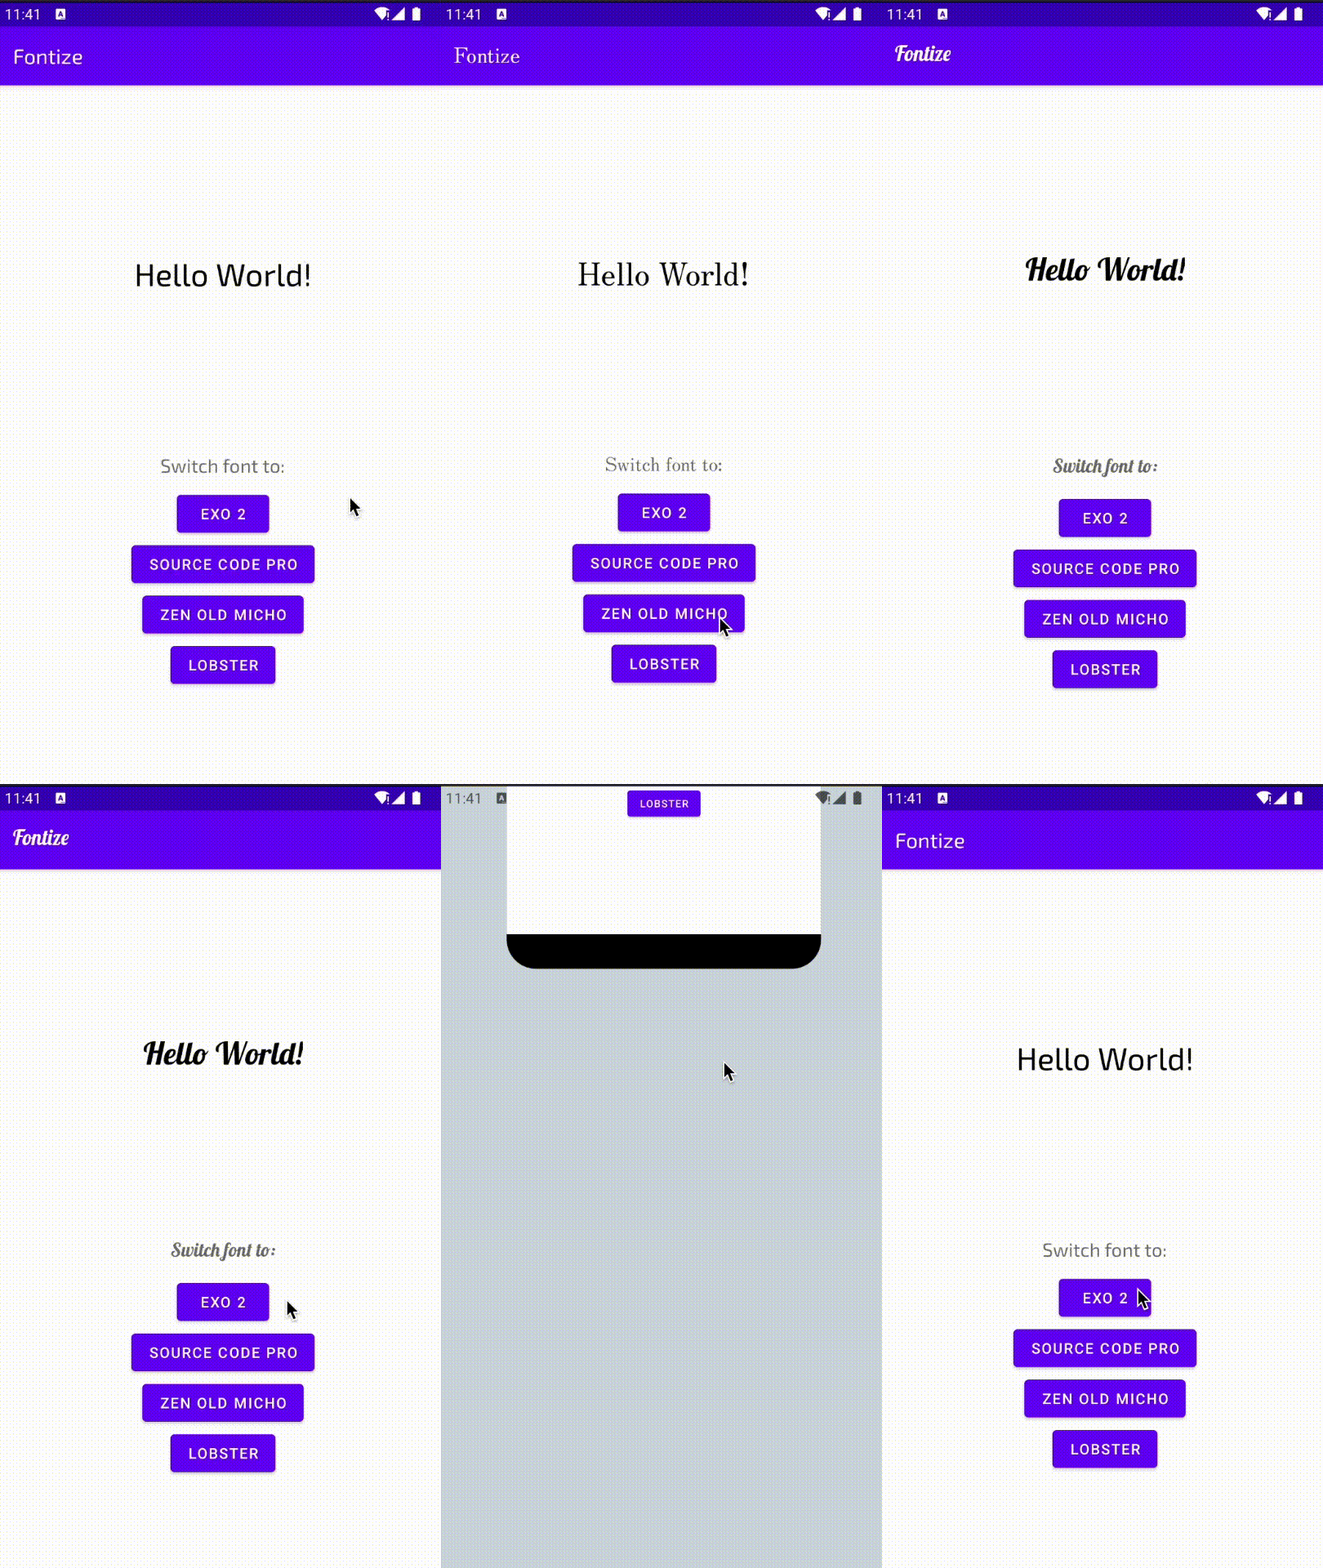
Once you add it to your project, you need to follow certain steps mentioned in the repository’s README.md file and your project will migrate to use intelligent Fontize views that can work united and can change fonts in a snap.
Here’s a demo of what you can Achieve with Fontize:

To set the default font for the app, you just have to add this line of code just below onCreate() function in your app’s launcher activity (the one that is triggered when app icon is clicked) only once:
Fontize(this).setDefaultFont(R.font.exo_2) // replace with the font you desire
Internally, this function creates a SharedPreference value if it doesn’t already exist:
fun setDefaultFont(resourceId: Int) {
    val sharedPref = PreferenceManager.getDefaultSharedPreferences(context)
    val fontId = sharedPref.getInt("fontFamily", ResourcesCompat.ID_NULL)

    if (fontId == ResourcesCompat.ID_NULL) {
        sharedPref.edit()
            .putInt("fontFamily", resourceId)
            .apply()
    }
}
To update the font for the entire app, you just need to run this code and Fontize will handle it automatically for you:
Fontize(this).updateFont(R.font.zen_old_mincho) // updates fontFamily throughout app
Here’s the interesting part, this function just updates the fontFamily value stored in SharedPreference for the app:
fun updateFont(resourceId: Int) {
    val sharedPref = PreferenceManager.getDefaultSharedPreferences(context)
    sharedPref.edit()
        .putInt("fontFamily", resourceId)
        .apply()
}
The actual work happens in the view classes. Let’s take the example of FontizeTextView, or any similar class. It just extends the parent View and applies the font by picking its value from SharedPreference:
class FontizeTextView(
    context: Context,
    attrs: AttributeSet
) : AppCompatTextView(context, attrs) {
    init {
        val prefs = PreferenceManager.getDefaultSharedPreferences(context)
        val fontId = prefs.getInt("fontFamily", ResourcesCompat.ID_NULL)
        if (fontId != ResourcesCompat.ID_NULL) {
            val typeface = ResourcesCompat.getFont(context, fontId)
            this.typeface = typeface
        }
    }
}
All this code does is, to override the default view to apply the font family as soon as it inflates. Similar classes for views that support texts within them, like workarounds for MenuItem(s) and Toolbar(s), will be shipped soon.
If you need to look at a live project that uses Fontize in production- checkout JekyllEx app on GitHub. It doesn’t use the initial version that was published on Jitpack, but it uses a custom fork as per its needs and requirements, but Fontize will soon evolve and be able to do a lot more than just TextViews 😄
Conclusion
Believe me or not, starting this project, to finishing the base version with a working FontizeTextView, to publishing it on jitpack- all just finished within 2 hours! Fontize deserves a star for that effort 😎.
I hope you learnt something new out of this post. If you want to keep reading quality Android development content, consider joining my newsletter, fill out the box at the top of the article.
Do comment and let me know what topic should I pick to publish an article next week. All kinds of feedbacks are appreciated :)
Thanks and happy coding!


